It’s easier than ever to stream games, but there’s a bigger difference between “technically live” and “actually watchable” than most newcomers think.
The software is free and only needs a small amount of hardware, but it takes a lot of configuration work to get everything set up so that your stream doesn’t look like it was shot through a fogged window.
What You Actually Need Before Going Live?
The minimum viable setup is simpler than most YouTube guides suggest: a PC or console, an internet connection with decent upload speed, and a free account on a streaming platform. That’s it. You don’t need a capture card, a dedicated microphone, or a second monitor to start.
That said, there are a few hard requirements:
Upload speed is the non-negotiable one. For a 1080p stream at 6,000 Kbps (the standard on Twitch), you want at least 8–10 Mbps upload to leave headroom. Streaming at exactly your upload ceiling causes instability dropped frames become common around 85% utilization.
If you’re only working with 5 Mbps upload, drop to 720p at 4,500 Kbps. The image will be softer, but a stable 720p stream looks far better than a pixelated 1080p one stuttering every 30 seconds.
CPU headroom is the second constraint. Software encoding (x264) is cheap in cost but expensive in CPU. A stream running at 1080p/60fps with x264 can pull 40–70% of a mid-range CPU just for encoding, leaving your game fighting for the rest.
If you’re on a processor from the last 3–4 years with a dedicated GPU, using hardware encoding (NVENC on Nvidia, AMF on AMD) gives you nearly the same quality at a fraction of the CPU cost. The tradeoff: hardware encoders are slightly less efficient at lower bitrates, so at 4,500 Kbps, the visual quality gap is real but minor.
Choosing Your Streaming Software
OBS Studio is the right choice for most people. It’s free, actively maintained, runs on Windows, Mac, and Linux, and is what the majority of full-time streamers use. Streamlabs OBS and StreamElements OBS are OBS forks with integrated alerting and overlays — convenient but heavier on resources, which matters if your system is already strained.
For console streaming, both PlayStation and Xbox have built-in broadcasting built directly into the system interface. These work fine for casual streaming, but give you limited control over quality settings and no way to add overlays or alerts without a separate capture card and PC setup.

OBS Settings That Actually Matter
Most OBS setup guides tell you to set things to specific numbers without explaining why. Here’s what’s actually happening:
Encoder and Bitrate
Open Settings → Output → and switch to Advanced mode. Under Streaming, the key decisions are:
- Encoder: Use NVENC (New) if you have an Nvidia GPU from the 1600-series or newer. Use AMD HW H.264 for AMD cards. Fall back to x264 only if you don’t have a dedicated GPU or if hardware encoding is introducing artifacts.
- Bitrate: 6,000 Kbps is Twitch’s cap for most accounts (partners can go higher). YouTube Live supports up to 51,000 Kbps, but most viewers are watching at 1080p/60, where 8,000–12,000 Kbps is the sweet spot. For Twitch at 1080p/60, 6,000 Kbps is the ceiling, and it’s enough if you’re using NVENC — x264 at the same bitrate will look marginally better because the encoder is more efficient.
Resolution and Frame Rate
1080p/60 is the standard for fast-paced games. For slower games — strategy, RPGs, visual novels — 1080p/30 is fine and cuts encoding demand significantly. Streaming in 4K is technically possible, but Twitch transcodes everything to 1080p anyway for most viewers, making 4K source material largely wasted unless you have a very specific audience or are on YouTube.
One mistake beginners consistently make: leaving the canvas resolution at 1920×1080 but not setting the output (scaled) resolution to match. If your canvas is 1080p and your output resolution is still at some random inherited value, OBS rescales every frame in real time and wastes CPU cycles.
Keyframe Interval
Set this to 2 seconds. Always. This is a platform requirement for Twitch and affects how smoothly viewers can seek in VODs. It’s one of those settings that’s easy to miss and causes soft, unpredictable quality issues when it’s wrong.
Audio: The Part Most Beginners Get Wrong
Viewers will tolerate lower video quality far more forgivingly than they’ll tolerate bad audio. A 720p stream with clear, level audio is more watchable than 1080p with a headset mic peaking and crackling.
The important settings in OBS:
- Sample rate: 48 kHz. Set this in OBS under Audio settings, and make sure your Windows audio device is also set to 48 kHz in the Sound control panel. Mismatched sample rates cause subtle drift and echo that’s maddening to diagnose.
- Bitrate: 160 Kbps for stereo audio is fine. 320 Kbps is a marginal improvement that most viewers, on average, will never notice in speaker setups.
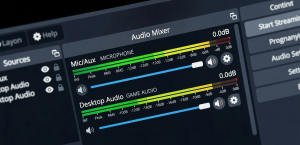
- Levels: Your microphone peak should sit around -12 to -6 dB during normal speech. Anything regularly hitting 0 dB will clip and sound harsh. OBS has a visual audio meter in the mixer — watch it while talking at your normal streaming volume and adjust accordingly.
For microphone options, a USB condenser like the Blue Yeti or HyperX QuadCast ($80–$130) is where most streamers start. They’re plug-and-play, sound noticeably better than headset mics, and don’t require an audio interface.
The step up is an XLR dynamic mic (like the Shure SM7B, ~$350) with an interface — better rejection of background noise, more broadcast-like tone, but significantly more expensive and complex.
Platform Choice: Twitch vs. YouTube vs. Kick
The short answer: Twitch for discoverability when starting in gaming, YouTube if you already make video content and have subscribers, Kick if you want higher revenue splits and fewer content restrictions.
Twitch has the largest gaming-specific audience, but discoverability is genuinely difficult for small channels in popular game categories. YouTube’s algorithm surfaces live streams to subscribers and can pull in new viewers if the game has search volume. Kick is newer, less mature, but offers a 95/5 subscription split vs. Twitch’s 50/50 for new affiliates.
Multistreaming to both Twitch and YouTube simultaneously is possible through services like Restream or Streamyard. However, Twitch Affiliate agreements restrict simultaneous streaming for affiliates, so it’s worth reading the terms before pursuing that route.
The Overlay Question
Every new streamer immediately wants a complex overlay with animated alerts, a follower count, a chat box, and a donation ticker. Resist this for the first month.
Overlays add setup time, introduce technical failure points, and often make small streams look cluttered rather than professional. A minimalist overlay (just a webcam frame and maybe a game-appropriate border) looks better at small viewership than a dense dashboard built for a 500-viewer channel.
When you’re ready to add alerts, StreamElements and Streamlabs both offer free overlay tools that integrate directly with OBS through a browser source.
The browser source approach embeds a live webpage directly into your scene, which means alerts can be animated without any additional software. OBS renders whatever the browser source sends.
Common Issues and How to Fix Them
Dropped frames: The most common cause is upload bandwidth instability, not insufficient speed. Run a stream for 10 minutes and watch OBS’s dropped frames percentage in the bottom bar. If it climbs steadily, run a test using Twitch’s bandwidth test tool or Fast.com while streaming to confirm. If your connection is stable but frames still drop, the culprit is usually GPU overload — enable “Use GPU” for rescaling in OBS output settings to relieve CPU pressure, or lower your output resolution.
Audio desync: Happens when your video and audio clock at different rates over a long stream. The fix is in OBS’s Advanced Audio Settings — set the “Sync Offset” for your microphone source to compensate. More elegantly, disabling Windows audio “enhancements” (found in sound device properties) eliminates the root cause for most users.
Stream looks blurry in motion: This is a bitrate problem, not a resolution problem. Fast-moving content generates more visual complexity and demands more bits. Lowering your in-game resolution slightly (rendering at 1600×900 then upscaling to 1080p) can reduce encoding difficulty and improve perceived sharpness.
One Thing to Do Before Your First Stream
Run a 30-minute test stream to a private channel (YouTube makes this easy with unlisted streams) before going live publicly. Watch the full VOD. You will almost certainly find an audio issue, a scene that doesn’t transition correctly, or a game capture that crops incorrectly.
These are trivially easy to fix in advance and genuinely embarrassing to troubleshoot mid-stream.
The other thing: check your stream key. It’s different for every platform, it lives in your account settings, and it expires if you reset it. It’s the one setting that causes “I have no idea why it’s not connecting” moments that cost 20 minutes of debugging before someone in chat asks if you checked your key.
Hardware Upgrades Worth Making (and When)
| Upgrade | Price Range | When It’s Worth It |
|---|---|---|
| USB condenser mic | $80–$130 | Immediately — biggest quality jump for the least money |
| Dedicated webcam (1080p) | $70–$150 | Once you’re streaming consistently, viewers engage more with face cam |
| Capture card (AVerMedia, Elgato) | $130–$200 | Only if streaming from a console without a PC or doing dual-PC setups |
| Stream deck | $100–$200 | Once you have multiple scenes and need quick, reliable switching |
| Second monitor | $150–$250 | Makes managing OBS, chat, and alerts while gaming dramatically easier |
A capture card is frequently overpurchased by new PC streamers. If you’re streaming PC games through OBS’s game capture source, you don’t need one. They become necessary when adding a console feed or running a dedicated streaming PC separate from your gaming PC.
Getting Your First Viewers
This isn’t part of setting up software, but it’s worth mentioning briefly: on Twitch, streaming into an empty channel and hoping the algorithm finds viewers doesn’t work in the beginning.
The feeds that get a lot of viewers quickly usually start a community somewhere else first, like on Reddit, Discord, or a social media site, and then invite those people to the stream. They don’t wait for strangers to find it.
When you don’t have many followers, consistency is more important than quality. Streaming at regular times trains the small audience you do have to show up, and showing up over and over again is what builds the social base that leads to discovery in the end.