There’s a unique, quiet satisfaction in unwrapping a new model kit. You are presented with cardboard boxes containing plastic trees (sprues), a crinkling bag of translucent bits, and a sheet of decals.
For a newcomer, this is an intimidating puzzle. For an experienced constructor, it represents raw potential.
If all you remember about model building is stringy, toxic-smelling tube glue melting the windshield of a plastic vehicle, you’re in for a surprise. Modern scale modeling has seen a silent revolution.
Kit design is exact, tools are highly specialized, and acrylic paints make the procedure cleaner and safer.
However, the barrier to entry can still appear high. Walk into any hobby shop, and you’ll see a wall of cryptic numbers (1/35, 1/72, 1/144) as well as racks of chemical washes, thinners, and cements.
Choosing Your First Kit: The Ambition Trap
The most common mistake beginners make happens before they even buy a tool: they buy a kit that is too large, too complex, or too poorly engineered. It is incredibly tempting to buy the massive 1/350 scale battleship or the hyper-detailed 1/32 scale fighter jet.
Do not do this. Large, complex kits take months to finish. When you are learning basic seam-line removal and painting techniques, a 600-part kit becomes an exhausting chore rather than a fun hobby. Burnout is the number one reason beginners quit.
Understanding Scale
Scale dictates the size of the model relative to the real object. A 1/48 scale airplane means 1 inch on the model equals 48 inches on the real aircraft.
- For Aircraft: 1/72 or 1/48 are the standard starting points. 1/72 is compact and cheaper; 1/48 offers parts that are easier to handle.
- For Armor (Tanks): 1/35 is the undisputed standard, offering a great balance of size and detail. 1/72 is available but often features frustratingly tiny parts.
- For Cars: 1/24 is the global standard.
- For Sci-Fi/Mecha: 1/144 or 1/100 are standard for Japanese mecha kits (like Gundam).
The Best Gateway Subjects
If you want the highest chance of early success, look at two specific categories:
- Bandai Gunpla (Gundam Models): Even if you do not care about anime, Bandai’s “High Grade” (HG) 1/144 scale kits are the best beginner kits on the planet. They require zero glue (snap-fit) and are molded in multiple colors. You can build a great-looking model using only a pair of cutters. They teach you how to read instructions and manage sprues without the stress of painting or gluing.
- Tamiya 1/48 Aircraft or 1/35 Armor: If you want historical subjects, Tamiya is famous in the modeling community for “shake and bake” kits. Their engineering is so precise that the parts practically fall together. Avoid older brands like AMT or Revell for your very first kit, as older molds often suffer from poor fit, requiring heavy sanding and putty work.
Before buying any kit, search for it on Scalemates, the largest database for scale models. Look at the “Timeline” to see when the tool (the metal mold used to make the plastic) was created.
A kit boxed in 2023 could use a notoriously difficult mold from 1978. Aim for kits tooled after 2000.
The Core Toolset: What to Buy and What to Skip
You do not need a $300 setup to start building. In fact, buying too many specialized tools early on can distract you from learning core skills. Here is the realistic beginner toolset.
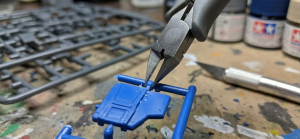
1. The Sprue Cutter (Nipper)
Do not twist parts off the sprue. Do not use scissors. You need a pair of flush-cutting side nippers.
- Budget choice: Basic Xuron or Plato nippers ($5–$10). They will get the job done, but leave a slightly rougher nub.
- Upgrade choice: GodHand SPN-120 or Tamiya Sharp Pointed Side Cutter ($35–$55). These slice through plastic like butter, minimizing stress marks.
2. The Hobby Knife
You need a standard hobby knife with a #11 blade (Excel or X-Acto). You will use this to shave off the remaining nub left by your nippers. Buy a pack of 100 replacement blades; a dull blade requires more pressure, which leads to slipping and bleeding.
3. Abrasives (Sanding)
Skip the sandpaper from the hardware store. Buy hobby-specific sanding sticks or sponges.
You need three grits:
- 400 grit: For aggressive removal of large nubs.
- 600 grit: The workhorse for smoothing out edges.
- 800–1000 grit: For final polishing before paint.
4. The Glue Revolution: Liquid Cement
If you take one piece of advice from this article, let it be this: Do not use tube glue. Modern modelers use “Extra Thin” liquid cement (Tamiya Extra Thin is the industry standard). It has the consistency of water and comes with a tiny brush in the cap.
How it works: You hold two dry, unglued plastic pieces together. You touch the brush loaded with liquid cement to the seam. Capillary action instantly pulls the liquid along the crack. The cement slightly melts the plastic, welding the two parts together. It dries in seconds, leaves almost no residue, and creates a bond stronger than the plastic itself.
Navigating the Paint Aisle: Hand Brushing vs. Sprays
Eventually, you will want to add color to your models. Paint chemistry is complex, but beginners should stick to a simple path to avoid a sticky, ruined mess.
The Three Types of Paint
| Paint Type | Thinner/Cleanup | Pros | Cons |
| Acrylic (Vallejo, Citadel) | Water / Mild thinners | Non-toxic, low odor, dries fast. The absolute best choice for hand-brushing details. | Can dry too fast on the brush; weaker scratch resistance. |
| Enamel (Testors, Humbrol) | Mineral Spirits | Levels out beautifully and dries to a hard shell. Great for washes. | Toxic fumes, long drying times (sometimes days). |
| Lacquer (Mr. Color, Tamiya Spray) | Lacquer Thinner | Dries instantly, bites into the plastic for ultimate durability. | Highly toxic fumes require serious ventilation. Will melt acrylics if sprayed too heavily over them. |
A Realistic Beginner Painting Strategy
Do not invest $150 in an airbrush setup yet. Wait until you have completed three or four models and know you are committed to the hobby.
Instead, use a hybrid approach:
- For large surface areas (car bodies, airplane fuselages, tank hulls): Use hobby spray cans (like Tamiya TS or AS lines). They provide a beautifully smooth, thin coat that is nearly impossible to achieve with a hand brush. Warm the can in warm (not hot) water for five minutes before spraying to get a finer mist.
- For small details (cockpit dials, tank tracks, pilot figures): Use water-based acrylics and a fine-tipped brush. Vallejo Model Color is widely considered the most beginner-friendly brush paint on the market.
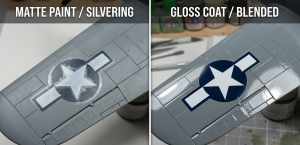
The Decal Process: Beating the “Silvering” Effect
Water-slide decals bring a model to life, providing the warning stencils, unit numbers, and insignia. However, beginners almost always run into a problem called “silvering.”
Silvering occurs when microscopic air bubbles get trapped under the clear film of the decal, catching the light and making the decal look like a shiny sticker rather than painted-on markings.
The Anti-Silvering Workflow
To prevent this, you must control the surface texture of your model. Paint, even smooth paint, is microscopically rough.
- The Gloss Coat: Before applying decals, spray the entire model with a clear acrylic gloss varnish. This fills in the microscopic texture, creating a perfectly smooth glass-like surface.
- Apply the Decal: Dip the decal in warm water, slide it off the backing paper onto the model, and gently dab away excess water with a cotton swab.
- Decal Solutions (Optional but Recommended): Products like Micro Set and Micro Sol are mild solvents. They soften the decal film, forcing it to melt into the panel lines and rivets of the model.
- The Final Coat: Once dry, spray a final clear coat (usually matte or flat for military subjects, gloss for cars) over the entire model. This seals the decal and unifies the surface sheen, making the decal look painted on.
Common Beginner Pitfalls
When observing newcomers to the hobby, a few consistent frustrations always emerge. Knowing these in advance saves a lot of ruined plastic.
Mistake 1: Chasing Perfection on the First Build
Your first model will have gaps. The paint might run. You might break a tiny radio antenna. This is normal.
Treat your first model as a test bed for learning how plastic behaves, how cement flows, and how paint dries. Do not expect competition-level results on day one.
Mistake 2: Gouging the Plastic
When cutting parts from the sprue, beginners often try to cut flush against the part with their nippers. This stresses the plastic and often tears a small chunk out of the model itself.
Fix: Always cut the plastic a millimeter or two away from the part. Then, use your hobby knife to gently shave down the remaining nub, or use your sanding sticks to sand it flush.
Mistake 3: Trapping Sanding Dust
If you sand a seam line and then immediately apply liquid cement or paint, the dust trapped in the plastic will turn into a messy paste.
Fix: Keep an old, soft toothbrush at your desk. Vigorously brush away the plastic dust after sanding, or wash the part in mild soapy water before painting.
Setting Up Your Workspace
Model building requires a dedicated space, even if it is just a small corner of a desk. If you have to unpack and repack your tools every time you want to work, you will quickly lose motivation.
The Bare Minimum Setup:
- Cutting Mat: An A3-sized self-healing cutting mat is essential. It protects your desk from knife blades and chemical spills, and provides a comfortable surface to work on.
- Lighting: Overhead room lighting is not enough. You need an adjustable LED desk lamp, ideally with daylight bulbs (5000K–6000K). Warm yellow lights will skew your perception of paint colors.
- Organization: Save small plastic containers or use a cheap tackle box to organize sub-assemblies. The “carpet monster” is a famous running joke in the modeling community—if a 2mm plastic piece falls on the floor, it vanishes forever. Keep your parts contained.
Final Thoughts
Model creation is primarily an exercise in patience and problem-solving. It’s a calm, tactile pastime in a fast-paced, digital world. The satisfaction stems not just from displaying the final piece on a shelf, but also from the quiet concentration necessary to construct an engine block out of thirty tiny pieces of plastic, or the enchantment of watching a decal settle perfectly into a panel line.